SmallDEVS and Players/Stage
Player/Stage
The Player Project is a free, open-source platform that provides work with simulated and real robots and sensor interfaces. This project creates Free Software that enables research in robot and sensor systems. The Player robot server is probably the most widely used robot control interface in the world. Its simulation backends, Stage and Gazebo, are also very widely used. It consists of 3 parts:
- Player robot device interface
- Stage multiple robot simulator
- Gazebo 3D multiple robot simulator
So far, we only use Player and Stage, but we would like to extend our research to do also 3D simulations in Gazebo.
Player
Player is a network server for robot control. It provides unified interfaces for various sensors and controls. Player communicates with TCP sockets, that means it is highly platform and language independent. Any language, that support TCP sockets, can be used to implement clients that connect to Player. Player can be seen as a Hardware Abstraction Layer (HAL) to the underlying hardware (robots, sensors, actuators or even the surrounding environment). See the list of supported HW. Player is configured through a configuration file. See section Configuration files in this document for more information.
Stage
Stage is a simulator. If a robot or some sensors are not at hand, stage can simulate them as they were really present. Stage is loaded into Player as a plugin. Hardware, that is simulated is defined in the configuration file of Player and is automatically handled by the Stage plugin. Simulated and real HW is treated in the same way, thus transition from simulated HW to real should be seamless. Stage provides simulation also for the surrounding environment as obstacles, collision detection, etc.
Installation
At the time of writing this document, the most recent version of Player is 2.1.1 and 3.0.1 for Stage. Although these versions should work well, I recommend to use a previous version of Stage, which is 2.1.0. This is because some sensors were not yet implemented in Stage version 3.0.1. Also I found, that my configuration files used in 2.1.0 were not working with this version. Regardless of what version of Stage you use, please bear in mind, that everything documented here was tested with Player 2.1.1 and Stage 2.1.0.
Both Player and Stage are compiled and installed from sources. Grab the sources from the Sourceforge download page. The installation procedure is nicely documented in Player/Stage documentation:
I have successfully installed Player and Stage to various Fedora distributions, most recently to Fedora 9. It should be no problem to install it to other Linux distros. Just run the configure script and check out what it needs.
NOTE: Before installing Player, ensure that the package libtool-ltdl-devel is installed on your system. If you have not installed this package, then Player will be compiled without plugin support. That means, you cannot load Stage plugin into Player and have to re-compile it! Check the output of the configure scripts for more information.
NOTE2: Don't delete the directory where you compiled and installed Player and Stage from. It is needed at the uninstallation process. If you want to uninstall Player and Stage, just type make uninstall in these directories.
Configuration files
Player uses configuration files to set up the robots and sensors. The configuration file defines the surrounding environment, the robots in this environment, their sensors, shape, colour, etc. Every device has its own interface. This insures, that the client program does not have to care about the actual HW that performs the requested operations. The actual communication with the devices is implemented in drivers. Each robot and interface is bound to a TCP port as described in the configuration files. There is a detailed tutorial on Writing configuration files.
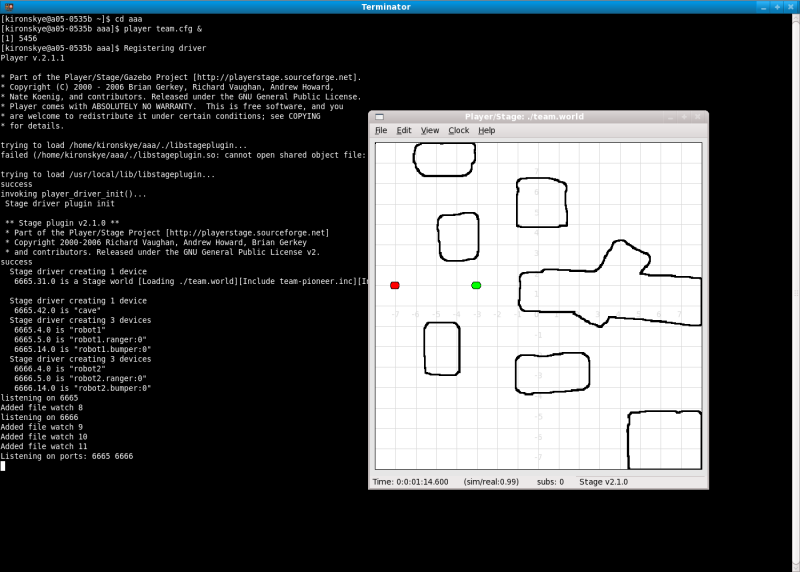
Here you can find a ZIP file with a sample configuration file. It defines an environment with some obstacles, 2 robots that both have positioning, 8 sonars an 8 bumpers. The robots are bound to TCP ports 6665 and 6666. Just execute "player team.cfg". You should see something like on the following picture.
Feel free to experiment with the robots. Use "playerv" to connect to the robots and to examine sensor data or to drive around.
SmallDEVS installation
Installation notes can be found on the official SmallDEVS page. SmallDEVS should run in Squeak 3.9.X. Here are some additional notes:
- install the Squeak 3.10 virtual machine found in the Virtual Machine section here, it works also with Squeak 3.9.X images
- download the actual Squeak 3.9 image or the squeak-dev image for developers by Damien Cassou (I personally recommend the image from Damien)
- download the source file for Squeak 3.9 and later versions
- run Squeak 3.9 and install the pre-requisite packages into the image (if you installed the squeak-dev image you can use Universe Browser for that, just open the World menu, select open and Universe Browser)
- install the actual SmallDEVS package as stated on the official SmallDEVS page, or the extended version for Player/Stage (see the end of the next section)
Preparing SmallDEVS for Player/Stage
SmallDEVS needs special methods to work with Player/Stage. These methods ensure, that SmallDEVS models are capable of decoding Player/Stage communications and also provide some useful conversions. Also a special communication model is used to connect to the Player server. Both the methods and the communication model have to be installed into the working image:
- download the special methods as a Monticello PlayerStage package and install them into the prepared Squeak image with SmallDEVS already installed, this can be done by adding a directory repository from Monticello Browser selecting the directory where you have downloaded the package, NOTE: this packages depends on the FFI package that has to be installed before from the Universe Browser
- download the Player/Stage communication model and the support prototype objects and load them into SmallDEVS using File List (open World menu -> open -> file list -> select the SAR package and click to install, you should see a new coupled model in your TMP directory in the MyRepository Browser)
You can also download the extended SmallDEVS package that already has the PlayerStage package and the communication model pre-installed (don't forget to load FFI!).
Communicating with Player/Stage in SmallDEVS
After all packages have been installed and everything is set up, we can start to create models that communicate with Player/Stage robots and sensors:
- create a new simulation
- copy the "playerstage" model from TMP to the simulation
- create additional models and connect them to the "playerstage" model
- start payer team.cfg
- start your simulation and observe what happens
The "playerstage" DEVS model is communicating with Player/Stage. For every robot you want to control, you will need a separate "playerstage" model. This is easily achievable with using copy/paste operations. Inside the "playerstage" coupled model is the playerIO atomic model. This model is responsible for the TCP communication with the Player server. You must tell the model the address of the Player server and the port it is communicating on. These values are stored in the "serverName" and "serverPort" slots of the model. By default the values are set to localhost, e.g. 127.0.0.1 and to port 6665 (which is the default port in Player). It is a good idea to initialize these values in the "initModel" method of the playerIO model and then reset the model.
Currently there are 4 Player/Stage interfaces supported by SmallDEVS:
- position2d, allowing to control the robot's movement and to get information about its position and orientation
- bumper
- sonar
- laser, experimental support, not well tested yet
Data from each interface is decoded by atomic models inside the "playerstage" coupled model. The data is represented by standard Smalltalk objects. Commands sent to the interfaces are coded into binary messages sent to the corresponding TCP port. These messages are constructed by special support methods that you have installed earlier. Data from the interfaces are not received automatically by default. You must tell the Player server, that it should send data from an interface. This is done by sending a subscription message to the given interface. After that the Player server starts to send the data from the interface in a given frequency. This is called the PUSH data mode, because the server sends the data continuously. The data mode can be changed to PULL, this means, that the Player server will send the data on demand. There are support methods in SmallDEVS to assembly subscription and unsubscription messages, but you don't need to use them directly. Just send a #on or #off symbol on the XXXReq input ports of the "playerstage" coupled model (check the tutorial videos below).
Data representations from the interfaces after decoding:
- position2d -> an Array #( #(px py pa) #(vx vy va) ms), where px, py and pa are the relative X, Y coordinates of the robot and the relative turn angle of the robot in rad, vx, vy and va are the velocity vectors of the robot and ms represents the motor state (not every driver supports motor state!)
- bumper -> an Array #( i1 i2 i3 ... ), where the size of the array is equal to the number of bumpers on the robot, iX is an integer (0 or 1) reflecting the state of the bumper
- sonar -> an Array #( f1 f2 f3 ... ), where the size of the array is equal to the number of sonars on the robot, fX is a float representing the distance measured on the sonar to an obstacle, if there is no obstacle, the value is the maximal value for sonars set in the configuration file
- laser -> an Array #( f1 f2 f3 ... ), where the size of the array is equal to the number of laser samples, fX is a float representing the distance measured on the Xth sample
Sending messages to the Player server is done with the methods in the PlayerClient class. These methods are used to create command messages, request or to decode sensor data sent from the Player server. If you use a method to create a command, the method returns an object of the class ByteArray. This byte array can be sent to the server through the input port command in "playerstage" coupled model.
Tutorial videos
The following tutorial videos demonstrate the basics of using Player/Stage with SmallDEVS. The videos are in Ogg Theora format that can be played with free movie players as VLC or mplayer.
Video 1 demonstrates how to install the communication model and the support prototype objects into an image, where SmallDEVS is already installed. It also shows, how to create a new simulation and how to copy the "playerstage" model into it.
Video 2 shows how to create 2 input ports, one for controlling interface subscription and one for sending commands to the Player server. Also a simple model (printer) is created, that can receive sensor data to its input port and display the data in the Transcript.
Video 3 shows how to start the Player server with the Stage plugin (using the configuration file linked previously). The "playerstage" model must be reseted in order, to have the serverName and serverPort slots initialized correctly. By sending the #on symbol to the req input port, we subscribe to the bumper interface and start to receive bumper data. You can see, how the data changes when the robot is collided with an obstacle.
Video 4 demonstrates how to send commands to the Player server. Commands are byte arrays that are sent to the corresponding TCP socket. The byte array is compiled by class methods from the class PlayerClient. In the video, Algernon is used to find PlayerClient in the system. Just press SHIFT-ENTER to bring up Algernon. The methods in PlayerClient are organized by interfaces. In the video, the position2d interface is used to instruct the red robot to move forward. In car mode, the robot receives the movement velocity and the turn rate (in rad/s). Methods in PlayerClient are usually commented at the beginning, try to experiment around ;) To construct commands and request on interfaces, not only the port is needed, but also the index of the interface. This is because a robot can have more instances of the same interface. This is differentiated by an index. In the prepared team.cfg file, all interfaces have index 0.
Video 5 shows how to use 2 robots by copying the "playerstage" model and changing the serverPort in the second model.

Link to this Page